- Joined
- Dec 20, 2012
- Messages
- 32
- Reaction score
- 4
http://www.youtube.com/watch?v=5VNkFgCjjHc
Building your own solar panel grants you autonomy from purchasing one off the shelf. Bought commercially these can cost a fortune but by being able to make one yourself you can save yourself money, learn and gain knowledge instead of being lazy and having someone else do the work.
The Suns rays are free, in parts of the USA there's an abundance of solar energy.
Yet, to harness them adequately, takes some work. Here's how you do it...")
Firstly you'll need a small workshop or area where you can work uncluttered. A flat surface is essential. In the shade is important, not only for comfort but you don't want your panel it 'go live' while your working on it. Especially in the case of a very large panel.
The right tools are also necessary.
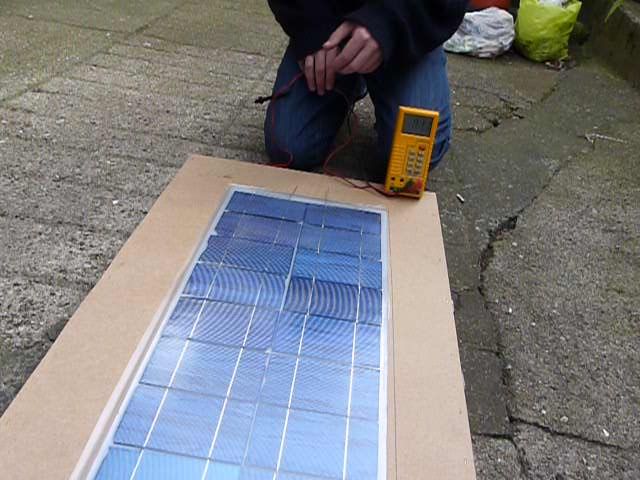
Solar cells - 0.5 volt 3.6 amp polycrystaline.
At least enough for 7 - 10 volts per array. If you're wanting to charge up a lead acid battery you'll need to build two or more of these. Otherwise re-charging it will be difficult. SOURCE: Ebay.
$0.75 per cell which is 0.5 volts each at peak power.
Be VERY gently handling them as they snap with ease.
http://www.ebay.co.uk/itm/36-3x6-Un...969?pt=LH_DefaultDomain_0&hash=item1c1ac5b1a1
Stuff you'll need for one array / panel.
1. Soldering Iron
2. Thin Solder
3. Clear, see-through perspex in a minimum of 2 equal sections.
Make sure you have the dimensions of AT LEAST 350mm x 750mm x 4mm. Any less and you're cutting it fine for margins to the edge with a 2 column displacement on your cells.
4. EVA (ethal vynal acetate), this what you need to seal in the cells to one another so they are crack resistant and will hold them together if they do crack (thus retaining conductivity.
5. A method to raise the perspex clear of each other. This may involve wooden beading (you'll need a table saw for ultra accuracy),DIY methods or use fine sections of perspex glued together.
6. Araldite glue (plenty of it!)
7. Surgical Gloves.
8. A heatgun (used for paintstripping) or a hairdryer.
First thing you need to do is order in some perspex and source your solar cells.
I used Plastic People for my clear perspex and ordered 2 sheets of equal dimensions.
http://theplasticpeople.co.uk/
Solar Panels being soldered
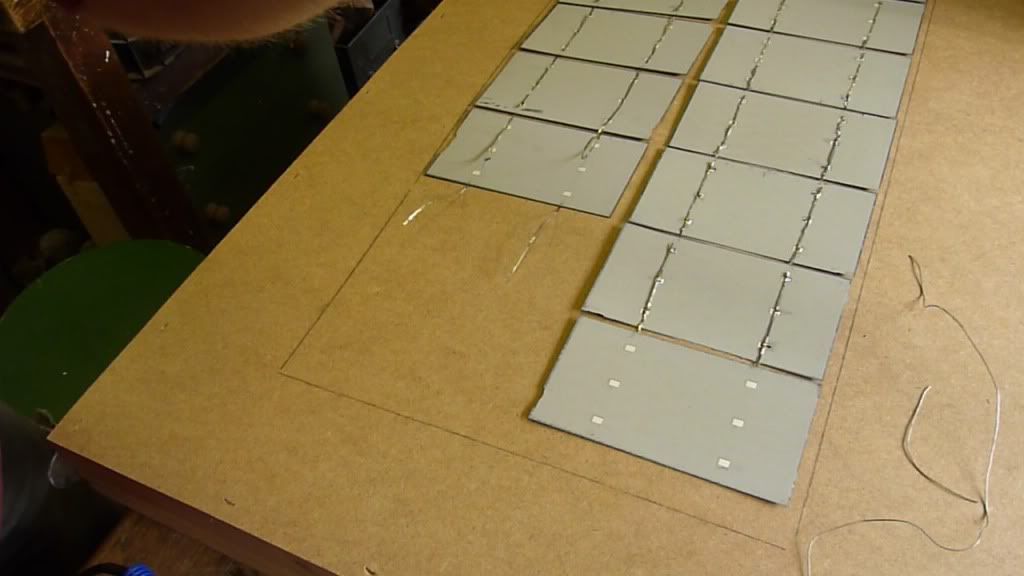
So by the picture above you can see that I've soldered a fair few and am coming to the end of the main soldering.
You want to have the 2 rows (or more) in a configuration where it runs like a railway track. One-way from top to bottom; The top being where you'll be making a 'bus' wire bridging the contacts, the bottom where you'll have the + and - wires running out of the array to be heatshrinked and joined by your voltage regulator wiring.
Once the soldering is done you need to sort the EVA out.
This needs to be laid out on top of and underneath the cells. Be careful as you'll have to move them back and forth as you go about soldering and placing the eva underneath etc.
You can't solder the cells with the EVA in place though as the heat will melt it.
Once you've got the EVA laid out you need to first get the feel on a sample section by heating it up and seeing how much heat you need etc.
If all this is too much for you to understand I totally agree, which is why I made a video of how to do it at the top of this page
Building your own solar panel grants you autonomy from purchasing one off the shelf. Bought commercially these can cost a fortune but by being able to make one yourself you can save yourself money, learn and gain knowledge instead of being lazy and having someone else do the work.
The Suns rays are free, in parts of the USA there's an abundance of solar energy.
Yet, to harness them adequately, takes some work. Here's how you do it...
Firstly you'll need a small workshop or area where you can work uncluttered. A flat surface is essential. In the shade is important, not only for comfort but you don't want your panel it 'go live' while your working on it. Especially in the case of a very large panel.
The right tools are also necessary.
Solar cells - 0.5 volt 3.6 amp polycrystaline.
At least enough for 7 - 10 volts per array. If you're wanting to charge up a lead acid battery you'll need to build two or more of these. Otherwise re-charging it will be difficult. SOURCE: Ebay.
$0.75 per cell which is 0.5 volts each at peak power.
Be VERY gently handling them as they snap with ease.
http://www.ebay.co.uk/itm/36-3x6-Un...969?pt=LH_DefaultDomain_0&hash=item1c1ac5b1a1
Stuff you'll need for one array / panel.
1. Soldering Iron
2. Thin Solder
3. Clear, see-through perspex in a minimum of 2 equal sections.
Make sure you have the dimensions of AT LEAST 350mm x 750mm x 4mm. Any less and you're cutting it fine for margins to the edge with a 2 column displacement on your cells.
4. EVA (ethal vynal acetate), this what you need to seal in the cells to one another so they are crack resistant and will hold them together if they do crack (thus retaining conductivity.
5. A method to raise the perspex clear of each other. This may involve wooden beading (you'll need a table saw for ultra accuracy),DIY methods or use fine sections of perspex glued together.
6. Araldite glue (plenty of it!)
7. Surgical Gloves.
8. A heatgun (used for paintstripping) or a hairdryer.
First thing you need to do is order in some perspex and source your solar cells.
I used Plastic People for my clear perspex and ordered 2 sheets of equal dimensions.
http://theplasticpeople.co.uk/
Solar Panels being soldered
So by the picture above you can see that I've soldered a fair few and am coming to the end of the main soldering.
You want to have the 2 rows (or more) in a configuration where it runs like a railway track. One-way from top to bottom; The top being where you'll be making a 'bus' wire bridging the contacts, the bottom where you'll have the + and - wires running out of the array to be heatshrinked and joined by your voltage regulator wiring.
Once the soldering is done you need to sort the EVA out.
This needs to be laid out on top of and underneath the cells. Be careful as you'll have to move them back and forth as you go about soldering and placing the eva underneath etc.
You can't solder the cells with the EVA in place though as the heat will melt it.
Once you've got the EVA laid out you need to first get the feel on a sample section by heating it up and seeing how much heat you need etc.
If all this is too much for you to understand I totally agree, which is why I made a video of how to do it at the top of this page